

MYK LATICRETE SP-100™ Tile Joint is a Stain Resistant, Water Resistant & Germ Resistant grout for Floor & Wall. MYK LATICRETE SP-100 Tile-Joint is suitable for ceramic tiles, vitrified tiles, marble and stone, especially in stain prone areas such as kitchens and washrooms.
Data Sheets MYK LATICRETE SP-100™ Tile Joint
Material Safety Sheets MYK LATICRETE SP-100 Tile Joint PART A
Material Safety Data Sheets MYK LATICRETE SP-100™ Tile Joint PART B
Material Safety Data Sheets MYK LATICRETE SP-100™ Tile Joint PART C
Features & Benefits
- 100% Stainfree
- Strong and durable
- Chemical and temperature resistant
- Anti-bacterial and anti-fungal
Product Details
Packaging
Net weight 1/5th unit - 1 kg & 1 unit - 5 kg. Factory proportioned unit consisting of three conveniently packed components - Hardner, Resin (part A and Part B) and coloured filler Powder (Part C)
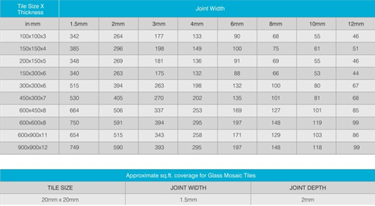
 Coverage
 Color
Available in a range of more than 40 colours
Certification
Color
Available in a range of more than 40 colours
Certification
Coverage
Color
Available in a range of more than 40 colours
Certification
- ANSI: A 118.3
- EN 13888: RG2
How to apply
Surface Preparation:
- Before starting to grout, remove debris in grout joints and lightly sponge the tile surface to remove dust and dirt.
- Do not clean tiles with acid cleaners. In case acid cleaners were used to clean the tiles, ensure to wash the area with plenty of water before commencing grouting.
- Substrate temperature must between 60°F (16°C) and 90°F (32°C).
- Empty entire contents of LATAPOXY® SP-100 Stain free Grout Part “A” and Part “B” container into a clean mixing pail.
- Mix with a margin trowel or a slow speed drill mixer until liquids are completely blended. Add at least ¾ of MYK LATICRETE SP-100 Tile joint Part “C” Filler Powder and mix to a uniform consistency.
- Add the remaining filler powder and mix to achieve a stiff mix to work into the joints.
- Immediately pour entire contents of bucket onto working area. Use a plastic sheet as a drop cloth. Use standard epoxy grouting techniques to work with SP-100 tile joints.
- SP-100 Tile joint can also be applied with a caulking gun. Be sure all grout joints are packed full.
- Remove as much excess material as possible before initial cleaning with grout float. Do not leave excess grout on the face of tiles.
- Not Mentioned
Related Products
 MYK LATICRETE® STELLAR
MYK LATICRETE STELLAR™ GROUT is a single component, high performance modified joint filling grout
MYK LATICRETE® STELLAR
MYK LATICRETE STELLAR™ GROUT is a single component, high performance modified joint filling grout